
Introduction
This article introduces the process to apply for a visa interview after receiving an offer letter from a research institute/university.
The main procedure is as follows.
1. Receive an Offer Letter
2. Receive DS-2019 from affiliated institution/university Immigration Office
3. Paying SEVIS fee
4. Apply for DS-160
5. Paying for Visa
6. Applying for a Visa Interview

Receive an offer letter
In the case of woojoodrem, I received a notice of post-doc recruitment from the principal investigator in early December 2020.
I applied to the lab in early October 2020, and I heard that I was accepted to post-doc for a week after the interview in early December 2020.
So I thought the process was going quite quickly.
After receiving the acceptance notice in December 2020 and discussing going to work in the spring of 2021, the offer letter writing began.
It took quite a long time to get the offer letter, although the application process was fast.
On February 25, 2021, the department officials began requesting the submission of documents (visa, photo, application form) for the preparation of the offer letter, and on April 28, 2021, I received the offer letter and completed the signature.
I am planning to go to work on July 1, 2021, so the required documents for my visa should have been issued in May 2021.
However, after signing the offer letter, procedures such as internal registration of the affiliated agency continued and visa documents were not issued.
It was not until June 2, 2021, that we decided to amend the offer letter to postpone the day of work by one month due to a delay in visa documents (Fig. 1).

However, it took another 13 days for this amended offer letter to arrive, and the reason was that the president's signature was delayed.
On June 15, 2021, my department office submitted my offer letter to the Immigration Department, and was informed that it would normally take 2-3 weeks to issue a visa (Fig. 2).

For other examples, the period from completing an offer letter to issuing a Visa document after passing an interview varies greatly.
It's finished as early as a month, but it usually takes 2-3 months to more than half a year.
Receive DS-2019 from affiliated institution/university Immigration Office
After completing the offier letter, DS-2019 will be sent when the Visa paperwork is completed by Immigration.
In the case of woojoodream, DS-2019 will be shipped to Fedex on June 25, 2021.
Immigration introduces procedures and documents for issuing visas with DS-2019 documents (Fig. 3).

The institution to which woojoodream belongs has enclosed a separate notice of the application process, so I proceeded accordingly.
I will introduce the details in the article below, but to summarize, the procedure is as follows (Fig. 4).
1. Paying SEVIS fee
2. Apply for DS-160
3. Paying for Visa
4. Applying for a Visa Interview

Paying SEVIS fee
SEVIS stands for Student and exchange visitor program,
and SEVIS fee is paid by reporting to the Department of Homeland Security that it will be in SEVIS.
The amount of SEVIS fee is about $220.
The description of SEVIS fee is located on the site below.
https://www.ice.gov/sevis/i901
I-901 SEVIS Fee
A chargeback occurs when a credit card holder disputes a charge that appears on a credit card statement. A brief investigation by the credit card company determines whether the charge is legitimate. If the charge is not legitimate, the credit card company
www.ice.gov
This site contains a description of SEVIS.
The video introducing SEVIS payment method is as follows.
https://studyinthestates.dhs.gov/students/i-901-sevis-fee-payment-video
I-901 SEVIS Fee Payment Video | Study in the States
Once you have received acceptance to a Student and Exchange Visitor Program (SEVP)-certified school, you will need to pay your I-901 Student and Exchange Visitor Information System (SEVIS) Fee. The below video provides a step-by-step guide of the requi
studyinthestates.dhs.gov
The SEVIS fee payment will be made through the link below.
https://www.fmjfee.com/i901fee/index.html
Department of Homeland Security - Form I-901
Official Website of the Department of Homeland Security OMB 1653-0034 (Expires 05/31/2018) ×
www.fmjfee.com
Click 'Pay I-901 Fee' on the first screen of the link above (Fig. 5).

Then you will see the screen shown in Fig. 6 and enter the information you received from the Immigration office (Fig. 6).

After you enter the applicant validation, you will enter the applicant information (Fig. 7).
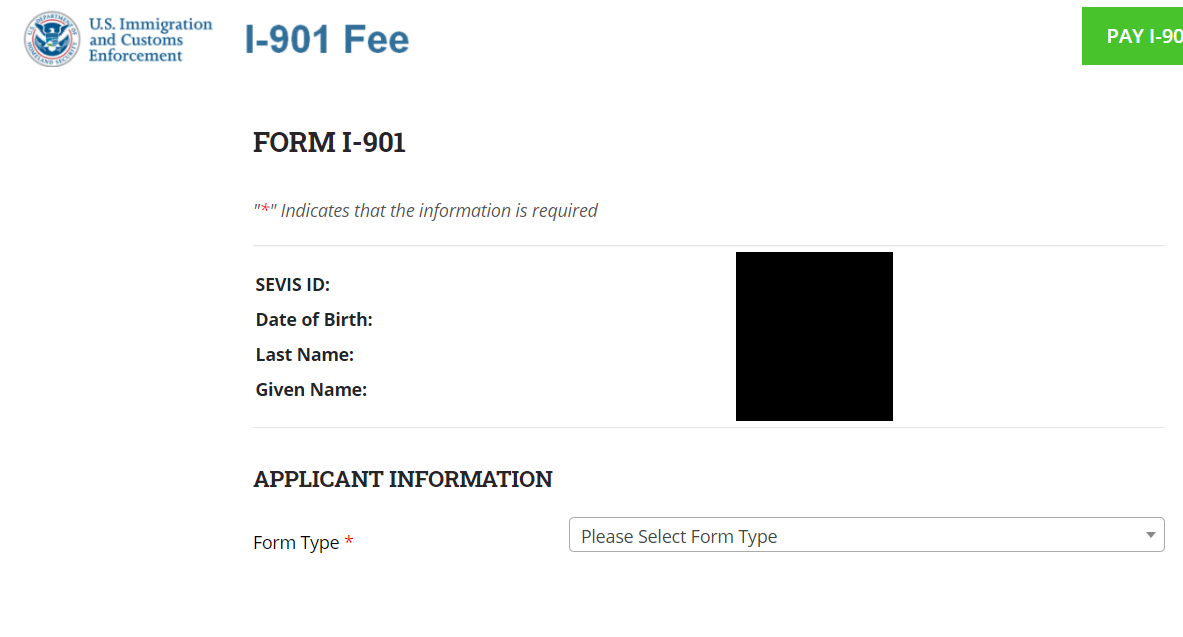
For woojoodream, 'Form DS-2019 (J-1)' is selected (Fig. 8).

Enter the email, address, and other information required afterward (Fig. 9).

Enter the information, check the contents, and proceed with consent (Fig. 10).

View the information you have entered since (Fig. 11).
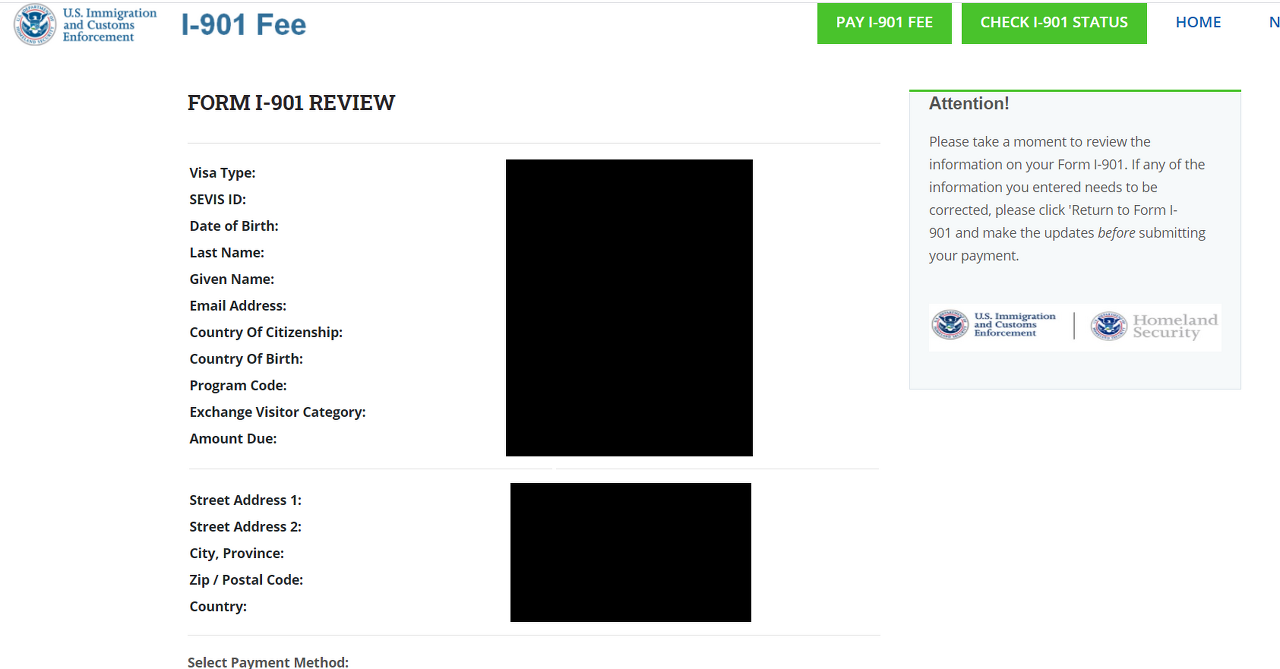
Next, proceed with the payment process (Fig. 12).

Final confirmation of payment information and click 'SUBMIT PAYMENT' (Fig. 13).

If the payment is successful, a payment completion notification will be confirmed (Fig. 14).

Click 'VIEW/PRINT PAYMENT CONFIRMATION' in Fig. 14 to save the confirmation as a PDF file.
Afterward, you need this confirmation for the visa interview,
so I save it, print it out, and keep it.
This is the end of the SEVIS fee payment process.
Apply for DS-160
For the Online Nonimmigrant Visa Application (DS-160), enter the link below.
https://ceac.state.gov/genniv/
Start the procedure on the homepage.
Select the country(s) you want to issue a visa from the red box marked (Fig. 15).

After entering the country information,
enter 'START AN APPLICATION' to proceed with the procedure (Fig. 15).
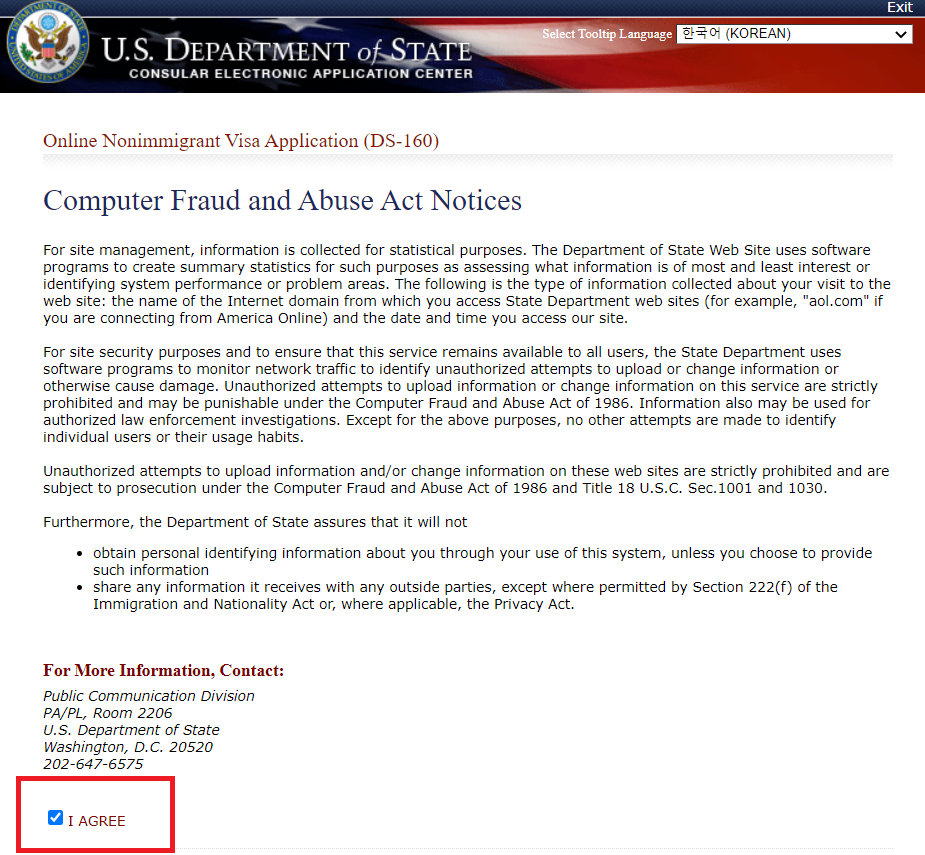
The Computer Fraud and Abuse Act Notes will then be guided to the following procedure,
and click 'I Agree' at the bottom (Fig. 16).
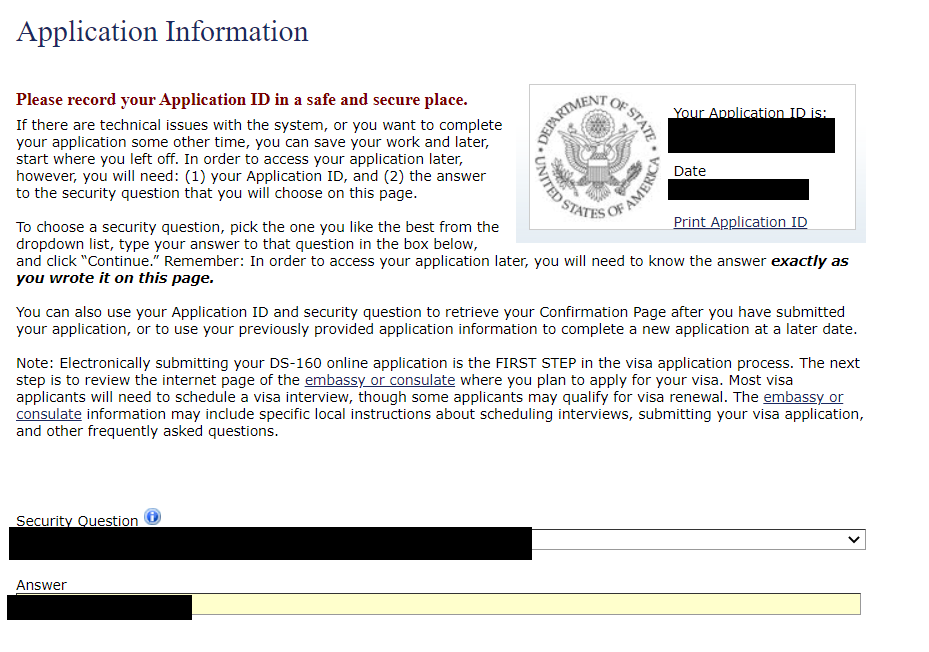
Then write security questions and answer to secure personal security (Fig. 17).
It is very important to note the 'Your application ID' and 'security answer' shown in Fig. 17.
The reason is that even if you log out in the middle, you can rewrite the saved contents based on Your application ID and security answer.
The DS-160 takes about 2 hours to complete, the login duration is 90 minutes, and if you don't record your Application ID and security answer, you have to repeat the same process.
Make sure to note 'Your application ID' and 'Security answer'!
Now start typing your personal information (Fig. 18).

Then enter your remaining personal information (Fig. 19).

Enter information about the visa type (Fig. 20).

Next, enter the travel companion information (Figure 21).

Write about your previous U.S. travel information (Fig. 22).

Write about your address and phone information (Fig. 23)

Enter your passport information (Fig. 24).

Enter information about your family (Fig. 25).

Write information about present work/education/training information (Fig. 26).

Enter security and background part (Fig. 27).

Fill out contacts in the United States (Fig. 28).

Upload a photo for the visa (Fig. 29).
You must comply with the appropriate ratio and regulations for the visa photo,
and it is recommended that you receive and submit electronic files when taking the visa photos at a photo studio.

Review the information you entered (Fig. 30).

After completing the information review, you will sign and submit it.
Paying for Visa
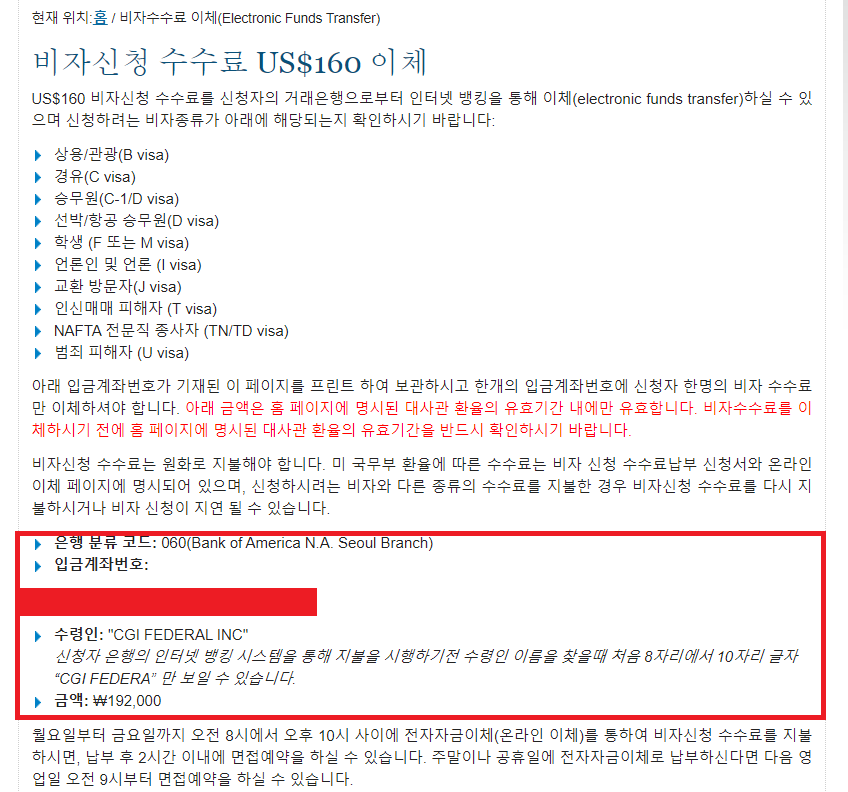
You have to pay for the interview before applying for it.
This is because the interview application process requires a receipt for payment (Fig. 31).
Receipt Name can create the account number from which the account was transferred.

The link for the J-1 Visa fee payment is as follows.
https://ustraveldocs.com/kr_kr/kr-niv-eft160.asp
미국 비자 신청 | 비자수수료 이체(Electronic Funds Transfer) - 대한민국 (한국어)
비자신청 수수료 US$160 이체 US$160 비자신청 수수료를 신청자의 거래은행으로부터 인터넷 뱅킹을 통해 이체(electronic funds transfer)하실 수 있으며 신청하려는 비자종류가 아래에 해당되는지 확인하
ustraveldocs.com
Make an online transfer to the account information in Fig. 31 below (Fig. 32).
The online transfer Bank of America (BOA) account number will correspond to the Receipt Name in Fig. 31.
Applying for a visa interview
The visa interview will be conducted through the link below.
Click "Schedule Interviews" at the bottom of this link (Fig. 33).
https://www.ustraveldocs.com/kr_kr/kr-niv-appointmentschedule.asp
미국 비자 신청 | 인터뷰 예약 - 대한민국 (한국어)
인터뷰 예약 이 페이지 항목: 개요 보조 서류 예약 변경 제한 추가 조치 --> 개요 일반적으로 미국에 입국하고자 하는 외국 국적 국민은, 단기 체류용 비이민 비자, 또는 영구 거주용 이민 비자를
www.ustraveldocs.com

To apply for a visa interview, you need to register as a member and get an ID.
I log in after getting my ID issued.
On the first screen after logging in, click 'New application/Schedule application' on the left panel (Fig. 34).

In the following screen, select 'Already completed the DS-160' because you submitted the DS-160 earlier (Fig. 35).

On the following screen, select the visa class J-1 (Fig. 36).

Approve the Terms and Conditions when it appears (Fig. 37).

Next, enter passport information,
DS-160 verification information, etc. (Fig. 38).

If you have a companion family, add family information (Fig. 39).

Here are some questions about Eligibility for the Interview Waiver (Fig. 40).

Enter visa delivery information issued as follows (Fig. 41-42).


Schedule the interview after entering the transfer information.
As shown in Fig. 42, the possible days and times are shown (Fig. 43).

After completing the interviews appointment (Fig. 44),
it is able to receive booking information via E-mail, or download PDF files (Fig. 45).
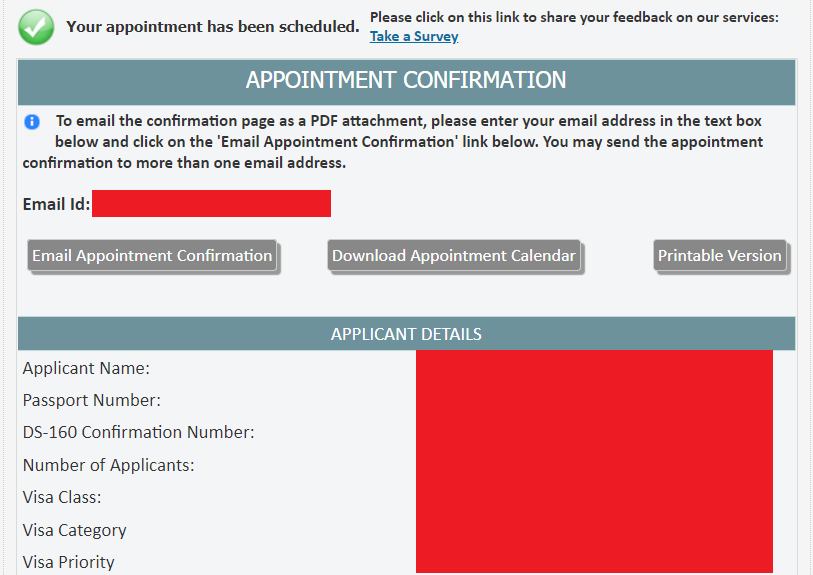

I've completed the interview reservation after a long process.
In the case of woojoodream, it took about 3 hours from SEVIS.
I think it would be better if you prepared it comfortably.
'Post-doc life > 해외 Post-doc 준비와 합격까지' 카테고리의 다른 글
| 미국 J-1 비자 인터뷰 후기 공개 (2) | 2021.07.09 |
|---|---|
| 미국 비자 인터뷰 복장에 대하여 (0) | 2021.07.09 |
| [SciTechIn]US visa - Expedited Appointment application (0) | 2021.07.04 |
| 해외 취업자의 국민건강보험과 국민연금? (0) | 2021.07.02 |
| Essential documents for J-1 visa interview (0) | 2021.07.02 |